Quickstart
From registration to configuration, start your device monitoring journey in 30 minutes.
1. Register a Platform Account
Visit the platform's official website https://da-en.m-iot.net/ , click on Signup on the page, fill in the company information as required, and submit.
Once approved, your company will be officially registered on the platform, and you will automatically become the company's administrator account. You will then be able to create and manage user accounts for other members within the company.

2. Add Team Member Accounts
After logging into the platform as an administrator, please switch the menu in the lower left corner to "Management Mode".
Go to the User Management page and click "Add User" to create a login account for your colleague.After the account is created , you can select the corresponding functional modules in the permission settings according to its responsibilities and assign it appropriate platform operation permissions.
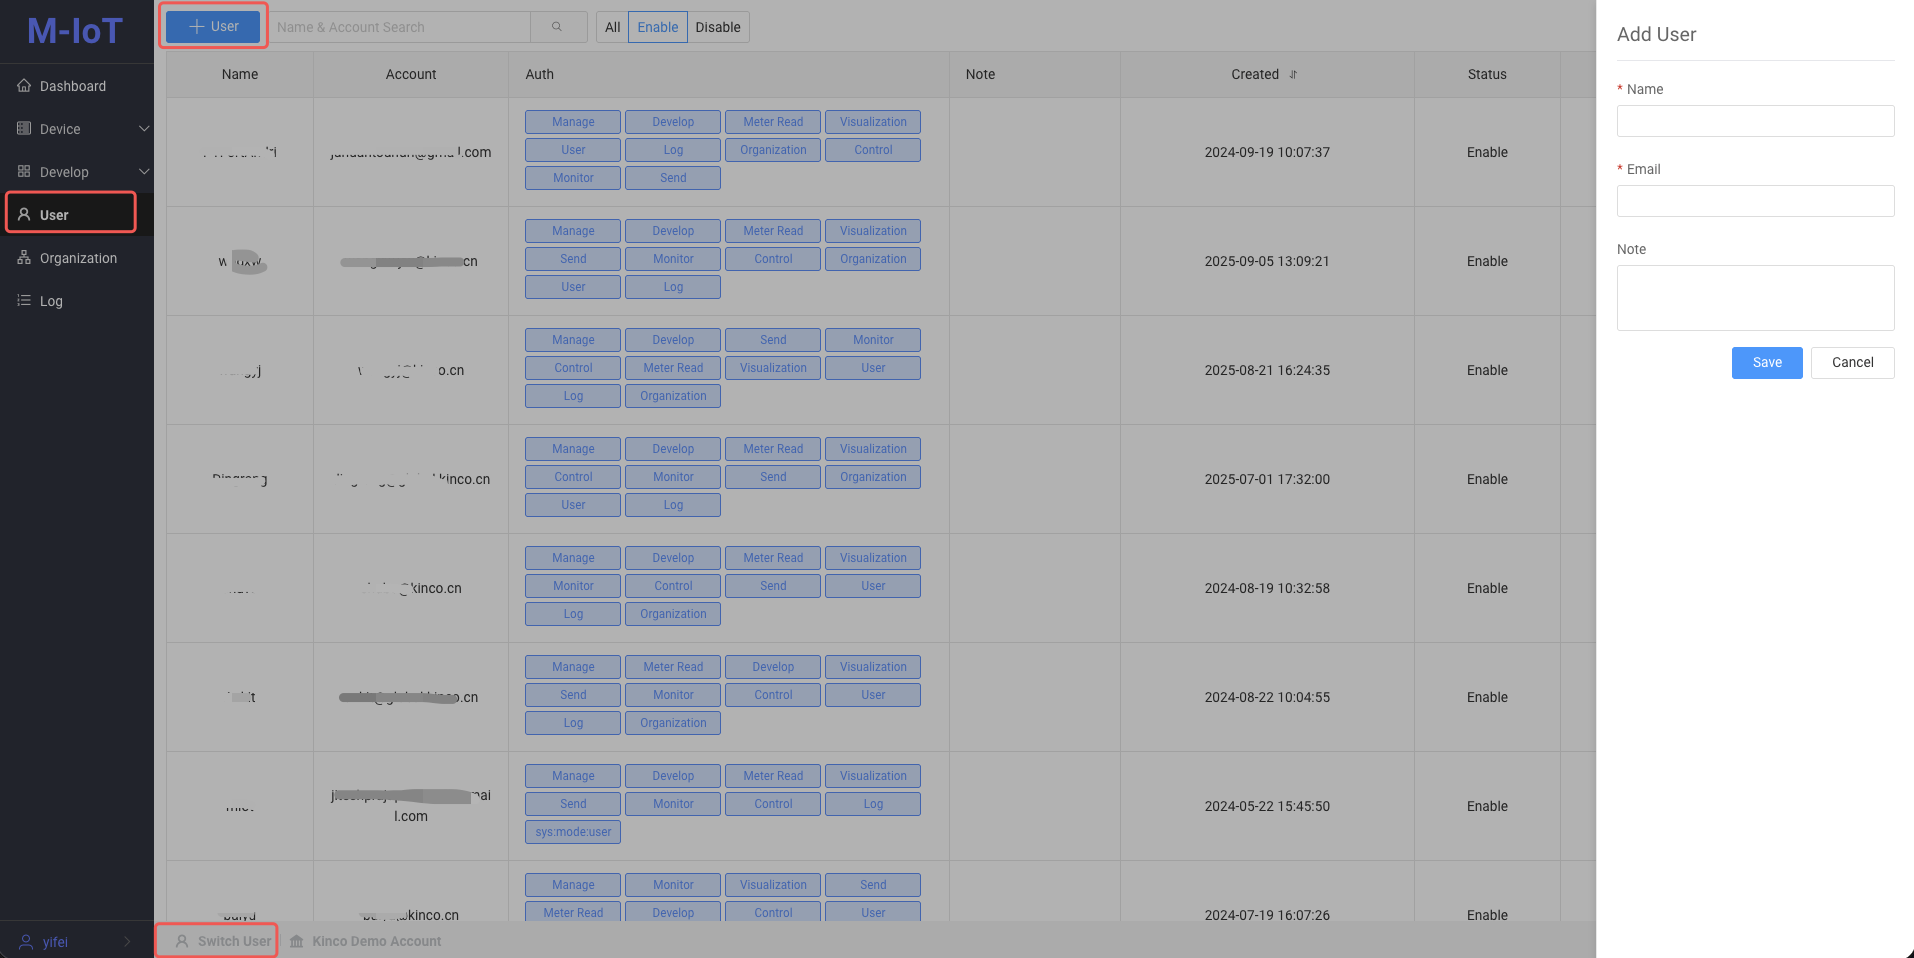
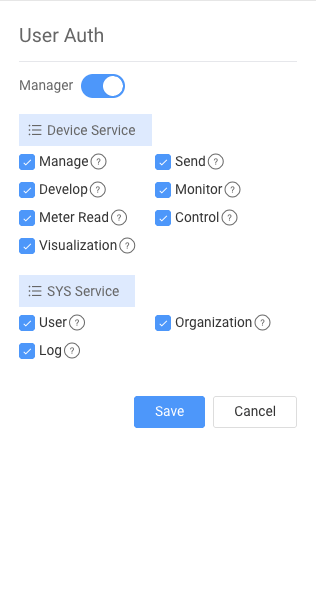
Permissions description:
- The "?" icon after each permission item indicates the specific functions included in that permission.
- "Administrator" privileges are critical; only users with these privileges can switch to "management mode" to configure and manage the system.
3. Create Model
Create a new object model by referring to Object Model.
Note :needs only to create an empty model for the time being, and the content of the follow-up model will be automatically synced by the HMI project.
4. HMI Project Integration Platform
- To use DTools: please refer to Integrating the MIOT plugin using DTools.
- To use DToolsPro: please refer to Integrating MQTT using DTP plugin.
Tip: After completing the above connection, your HMI has completed most of the IoT configuration and can realize remote monitoring and alarm functions for devices.
⚠️Important Notes: After burning the project to the HMI and powering it back on, if the device does not automatically register with the platform, please check that the mach_no field reported by the device's MQTT registration message (m3c/dau/evt/boot) is not empty when it is triggered (the default setting is device startup).This is a necessary condition for successful device registration.
5. Centralized Equipment Monitoring
If you see the message "Model application configuration has not been configured, please contact the administrator" when you open the "Device Monitoring" option under the user menu, it means that the attributes to be displayed by the device monitoring have not been configured.
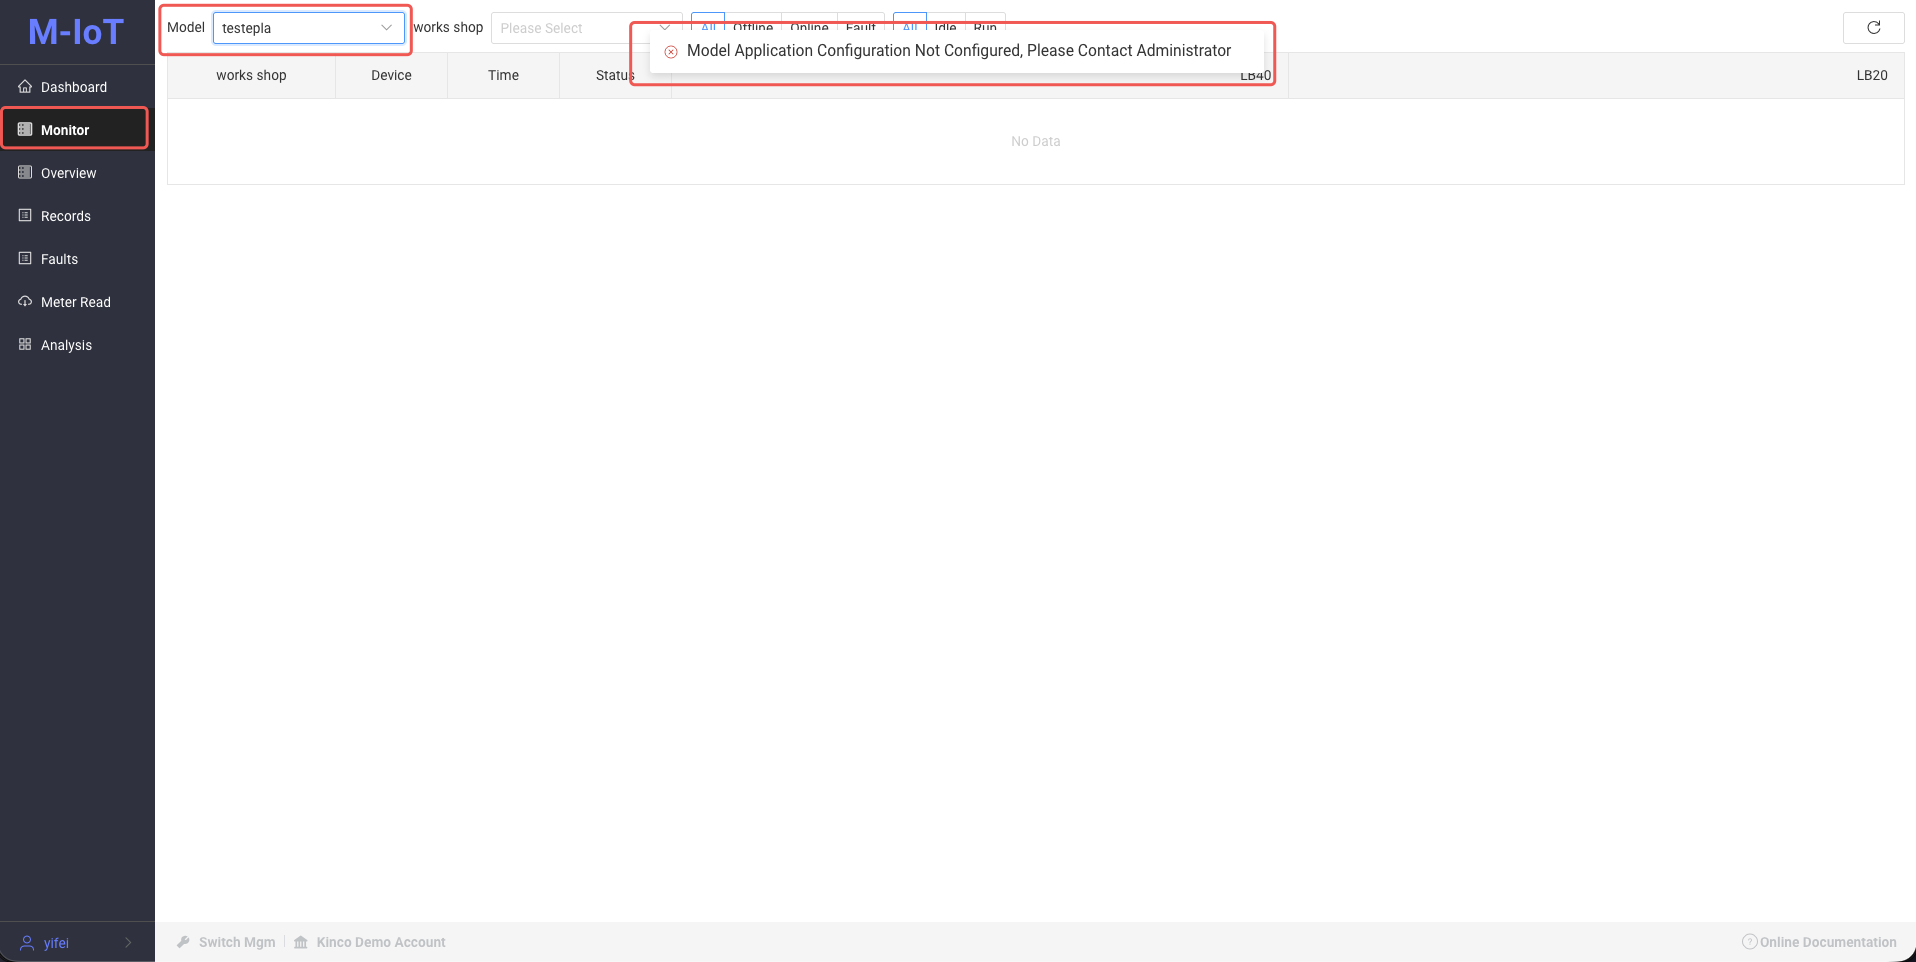
Please switch to the management menu, open Development Management → Model App, and in Device Monitoring Config, configure the attributes that need to be displayed in the monitoring screen .
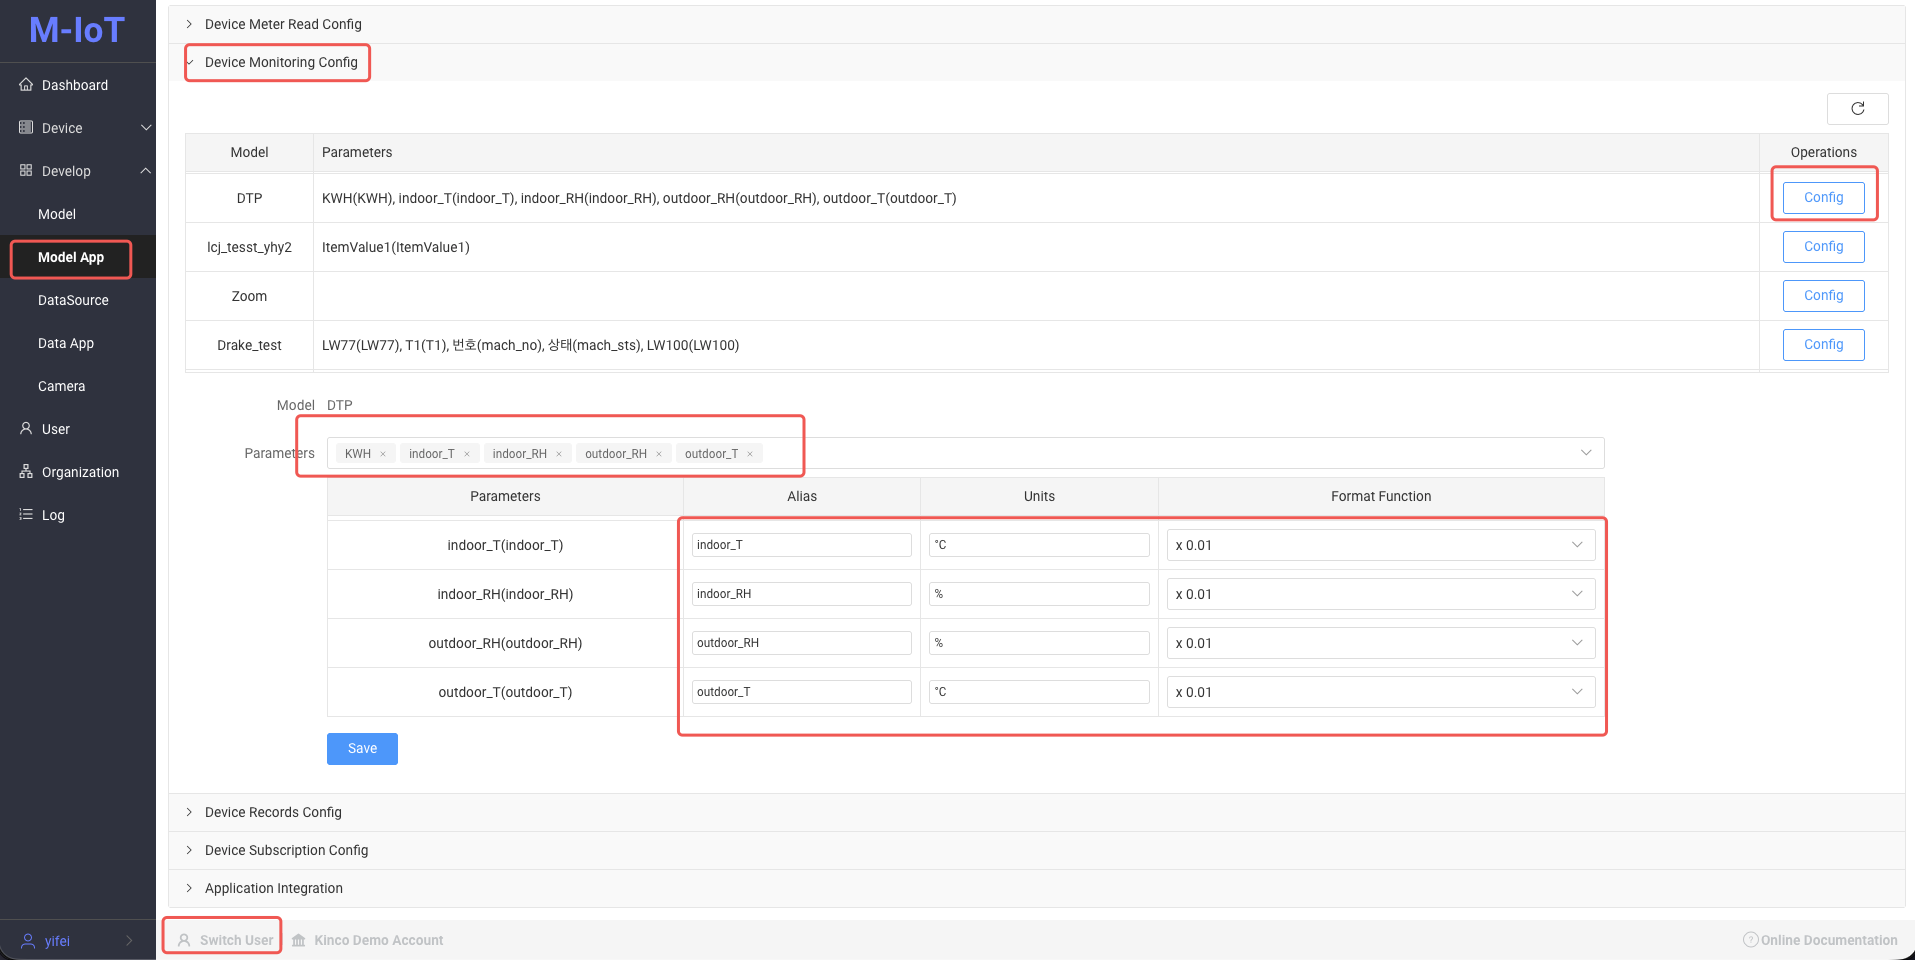
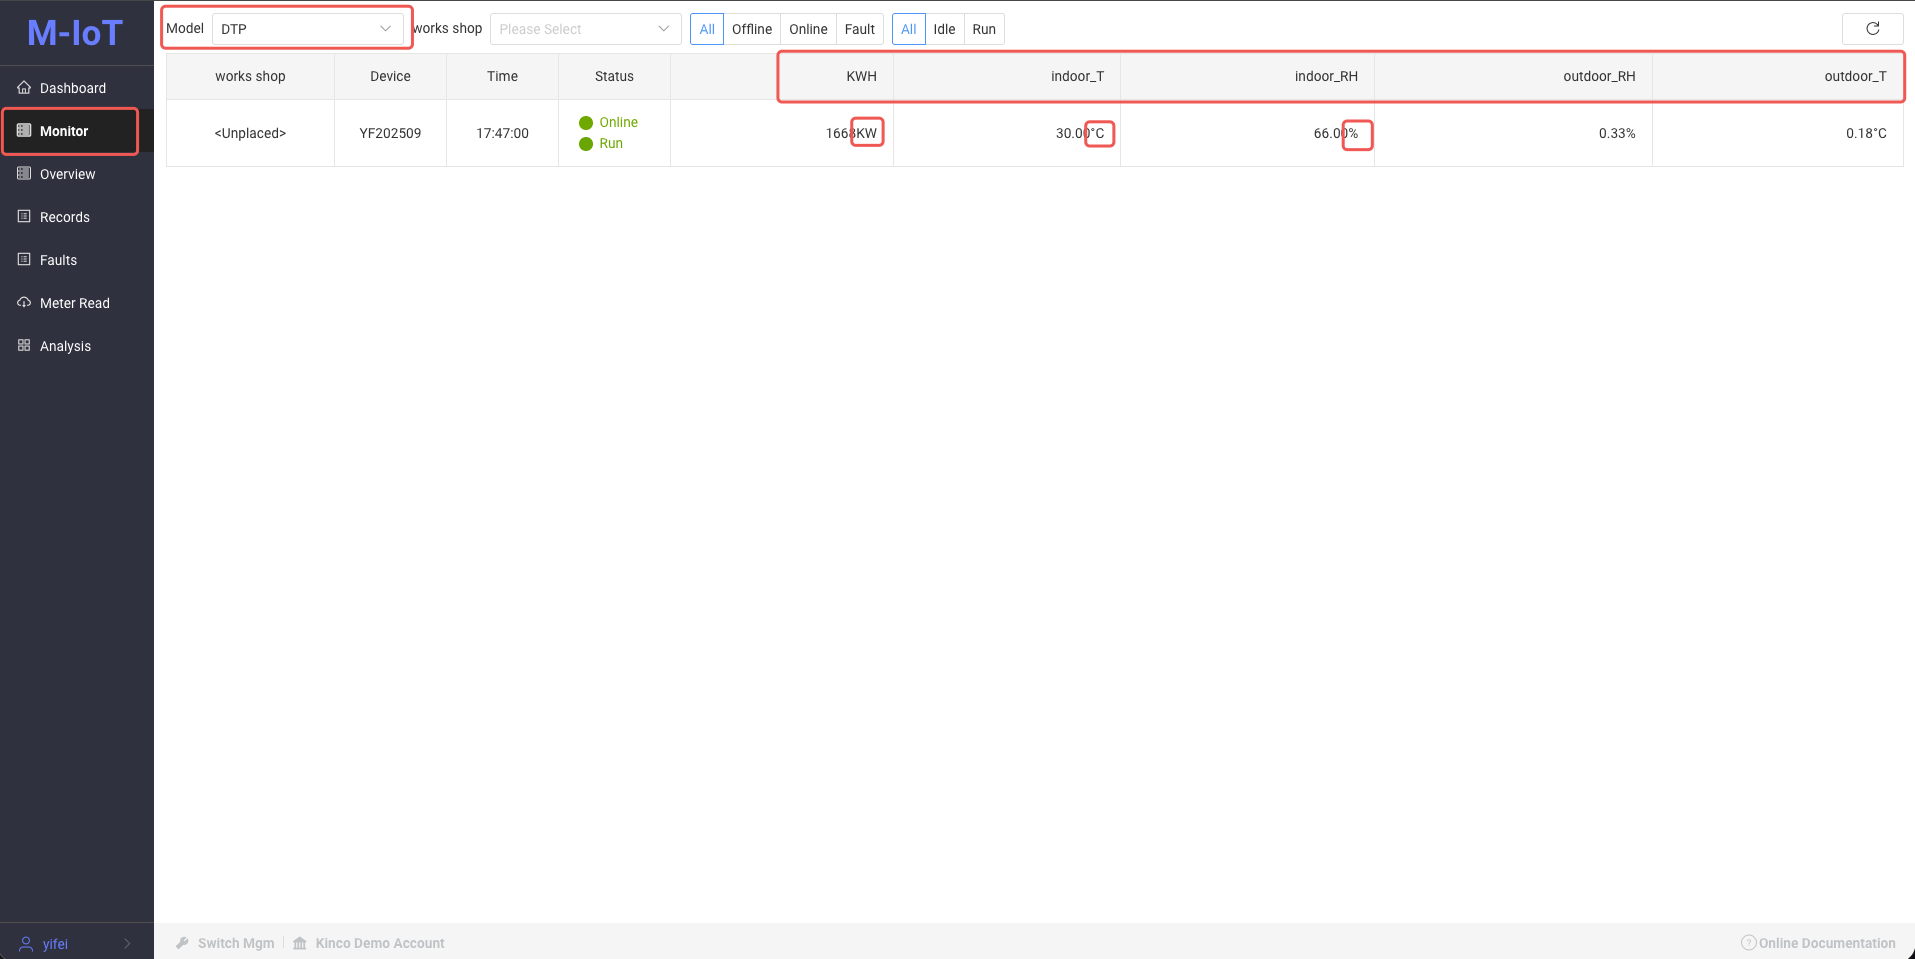
Configuration Instructions: You can set aliases for attributes to replace the original field names, add display units, and perform decimal point shifting on numerical values.
6. Equipment Records
Open the Records in the user menu. If the list header only displays the Time, Device Status, and Network Status, it means that the specific device attributes that need to be displayed in the records have not yet been configured.
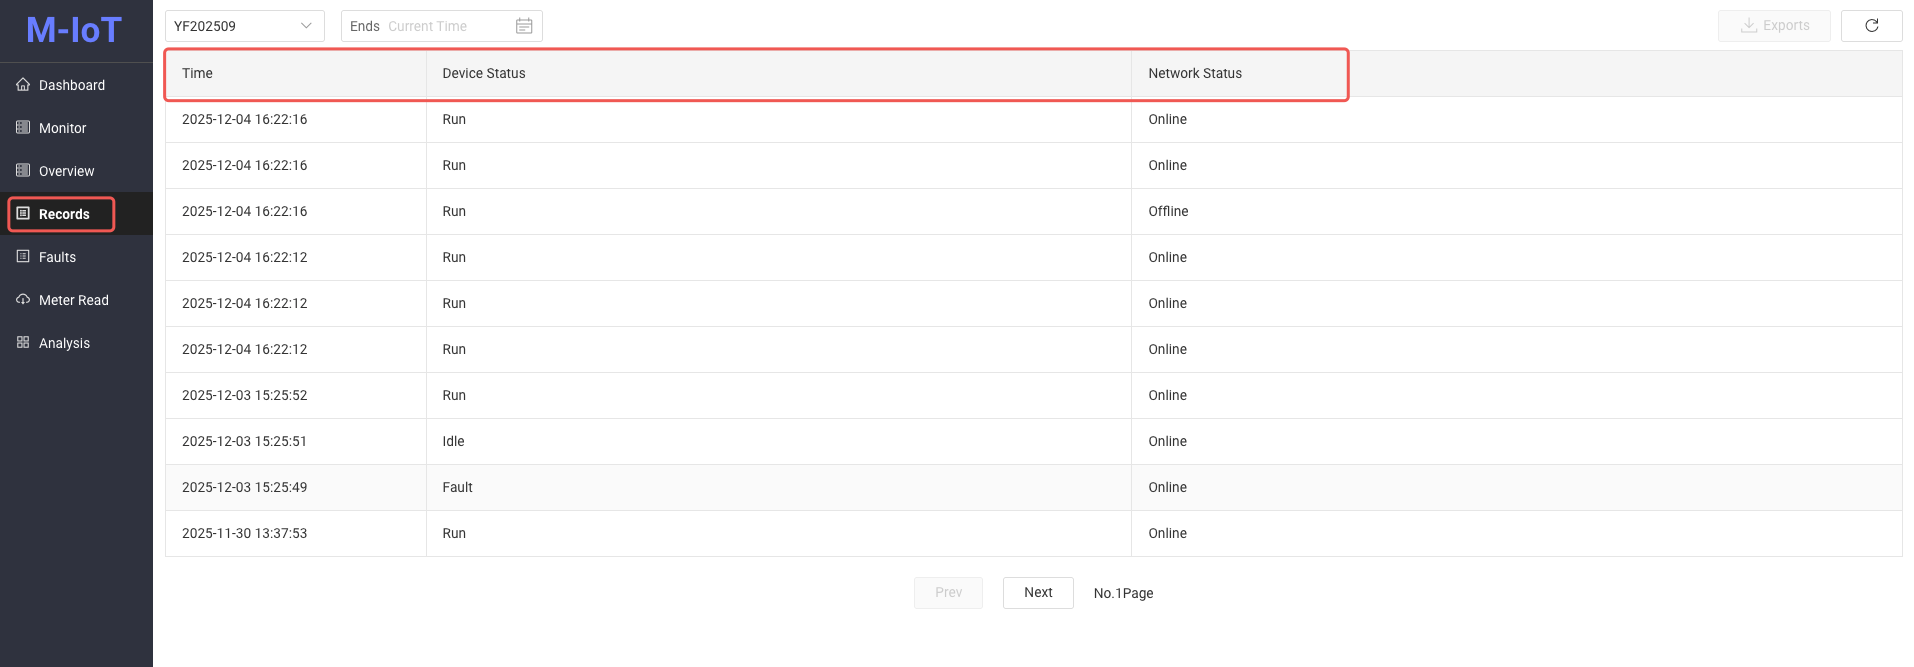
Please switch to the management menu, open Develop → Model App, and in Device Records Config, configure the attributes that need to be displayed in the device record screen.
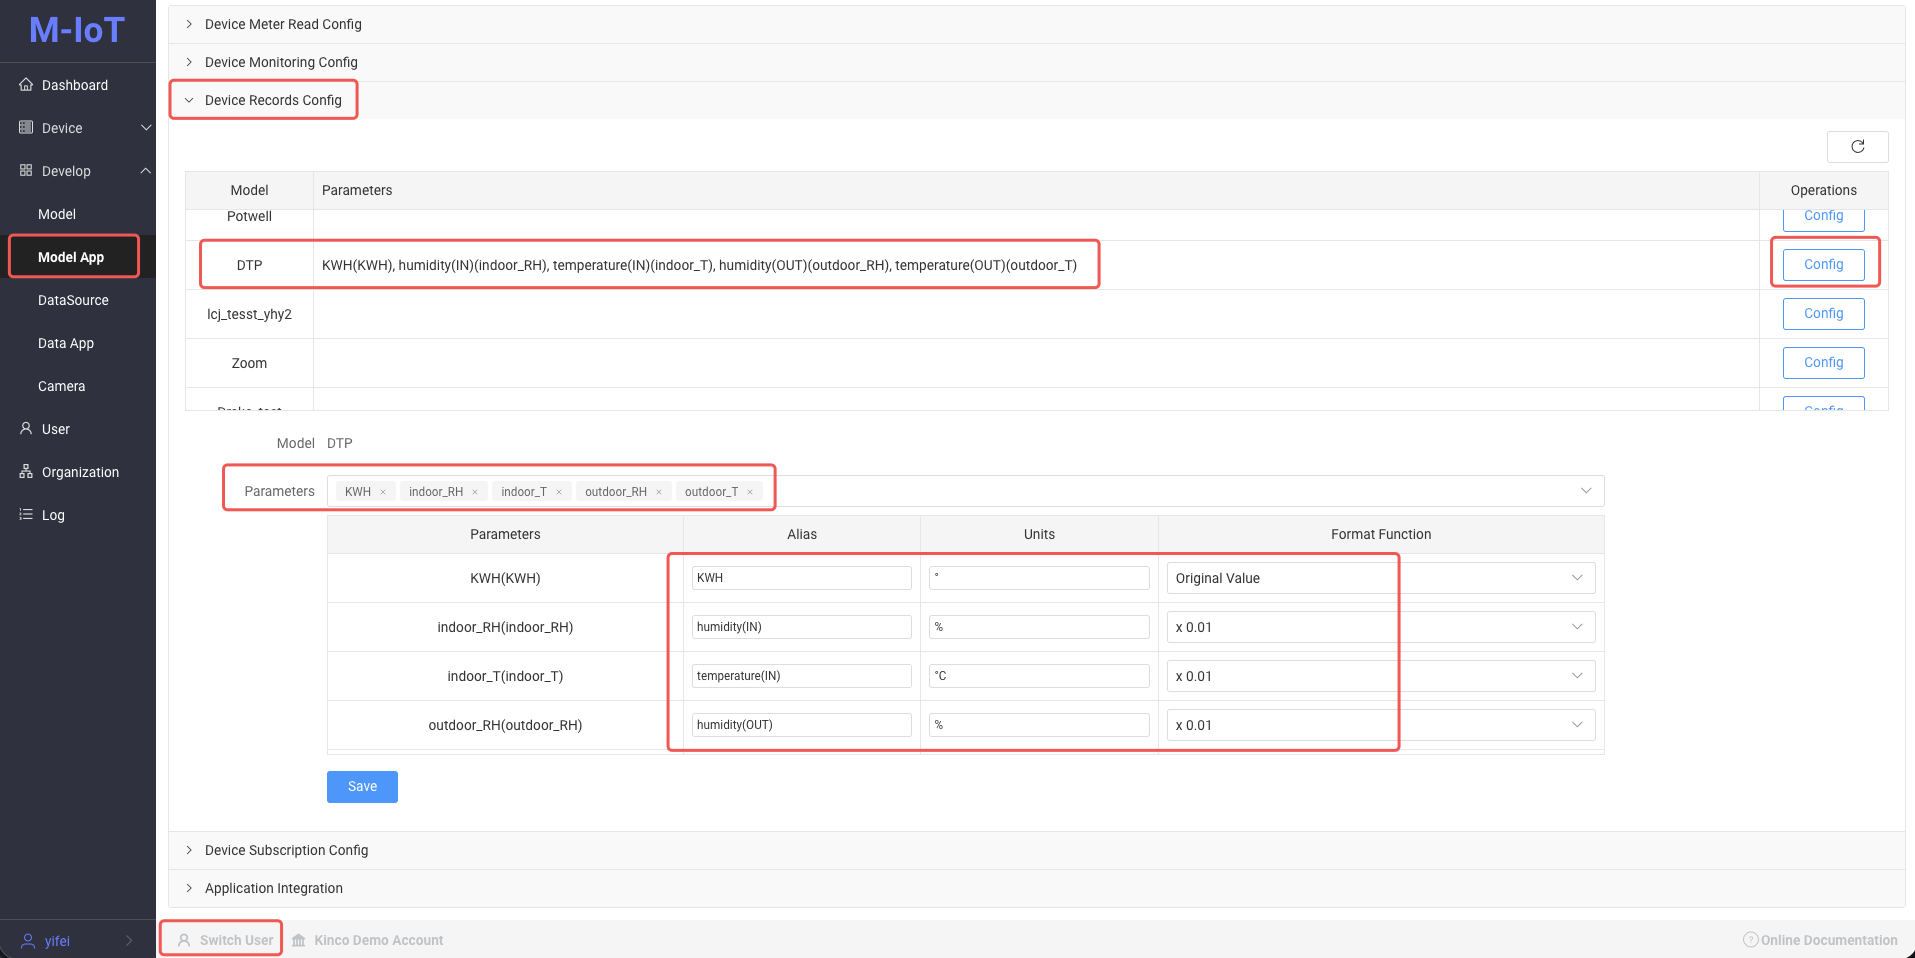
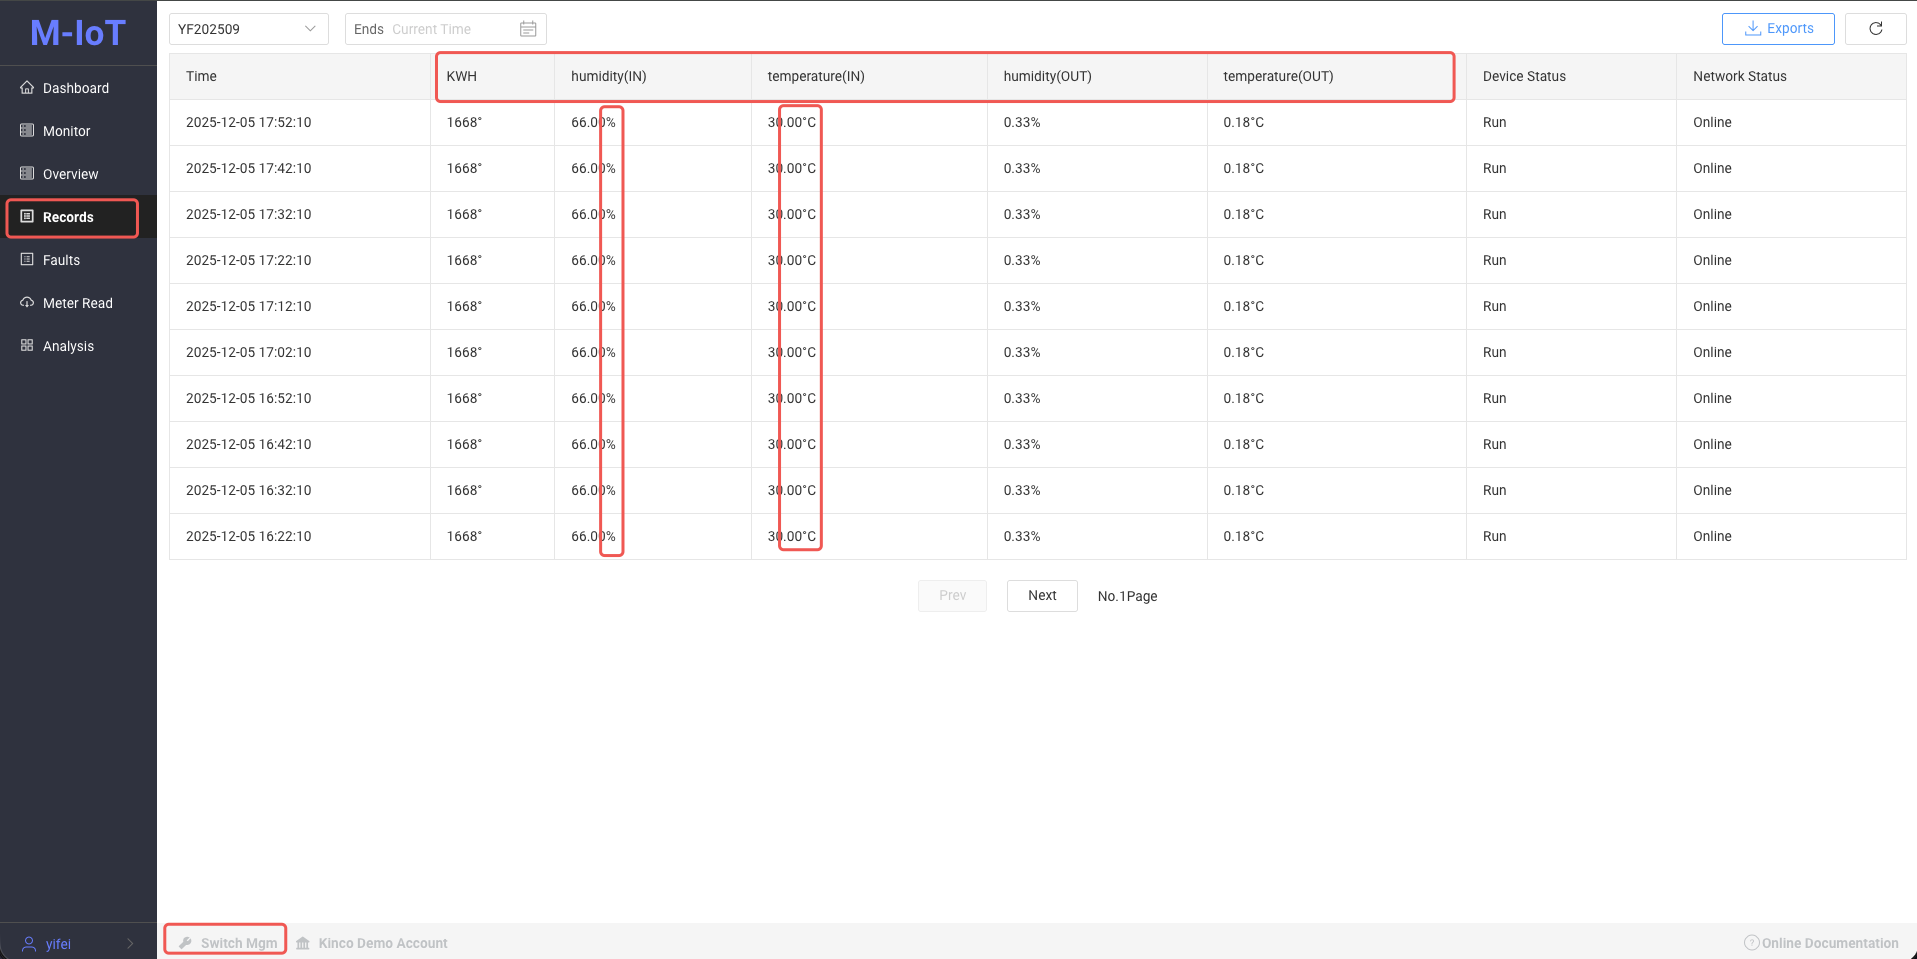
Configuration Instructions: You can set aliases for attributes to replace the original field names, add display units, and perform decimal point shifting on numerical values. Data Export: On the device record page, historical time-series data can be exported.You can select a time range to download, and a maximum of 200,000 data points can be exported at a time.
7. Configure Device Alarms and Message Push Notifications
The platform supports two device alarm configuration methods, which you can choose or combine as needed.
Method 1: Faults are proactively reported by the HMI project
By configuring the m3c/dau/evt/errs topic in the HMI project, the fault status of the device is reported to the cloud.
- Use DTools: for configuration methods see 5.4 theme: m3c/dau/evt/errs
- Use DToolsPro: for configuration please refer to 7. Fault Reporting.
- Reporting Logic: HMI alerts by position (1: generated, 0: release).
Method 2: Threshold Alarm Based on Model Attributes Set outbound trigger conditions for numerical attributes defined in the model to achieve automatic alarm.
- Configuration path: please refer to the Alarm Settings function in the Model Management.
- All configurable properties are numeric types, and currently only single properties can be used to set trigger conditions.
Message push settings To push alarms and other information to specific users, please configure the subscription as follows:
- Switch to the management menu, then go to Development Management → Model App.
- In the device subscription configuration, add a new subscription rule and select the users who need to receive messages and the devices to subscribe to.
- Subscribed users need to follow the official WeChat account "Machine IoT Platform" and complete the binding process through the mini-program to ensure they can receive push notifications normally.For detailed instructions, please refer to How to Subscribe to Device Messages.
8.Sending Commands and Data to the HMI
The platform supports sending commands or parameters to the HMI to trigger the device to perform specific operations.For detailed configuration instructions, please refer to Sending IX to HMI via Platform.
⚠️ Note: If the platform displays "Send failed" but the HMI has actually received the instruction, it is usually because the HMI did not send a receipt confirmation message to the platform.Please check if the configuration of the
m3c/dau/ack/conftheme in the HMI project is correct.
- use DTools: please confirm that 5.5 theme: m3c/dau/ack/conf is configured correctly.
- use DToolsPro: please confirm that 8.2 Notification of successful subscription reception is configured correctly.
Additionally, please confirm that the trigger condition for
m3c/dau/ack/confis set to change the trigger viareqafter receiving a platform message, and check whether the contents of related fields such asridandcmdare correctly filled in.
9. Create Monitoring Screen Displays for the Device.
The device monitoring screen is used to centrally display the real-time operating data of the device.You can complete the creation of the image in the following two steps:
- Use the template to initialize the screen
Refer to Using a template to initialize the device monitoring screen to quickly create the screen framework.After initialization, the components in the page will be displayed as static values. - Bind device real-time IX
Refer to How to bind device real-time IX, configure the corresponding real-time data source for each screen component one by one, so that the large screen can dynamically display the actual status of the device.